Create your account
Sign up for Boki and set up your workspace
Create your account
You'll create a Boki account, set up your first workspace, and see the dashboard. This takes about 2 minutes.
What you'll accomplish
By the end of this tutorial, you'll have:
- A Boki account
- Your first workspace
- Seen the welcome tutorial
- Access to the dashboard
Prerequisites
- A web browser
- An email address or Google account
Step 1: Go to Boki
Open app.boki.io in your browser.
You'll see the sign-up screen.
Step 2: Create your account
You have two options:
Google sign-in: Click "Continue with Google" and authorize Boki.
Email and password: Enter your email and create a password.
Password requirements:
- At least 8 characters
- At least one lowercase letter
- At least one uppercase letter
- At least one number
Click "Create account" or "Continue with Google".
Confirmation: You'll see a verification step. Check your email if using email/password sign-up.
Step 3: Set up your workspace
After account creation, you'll go through AI onboarding to set up your first workspace.
With a website
- Enter your website URL (if you entered one during sign-up, it's pre-filled)
- Follow the onboarding prompts
- Boki analyzes your site to personalize the workspace
Without a website
- Choose to skip the website step
- Enter just a workspace name
- You'll land on a plain dashboard with the Boki agent/researcher chat ready to use
Workspaces created without a website skip the getting-started checklist and go straight to the dashboard with the chat docked open.
Joining an existing workspace
If you were invited to an existing workspace, it will appear in the list. Click it to join.
Confirmation: You'll land on the dashboard ready to create content.
Step 4: Watch the welcome tutorial
First-time users see a welcome video inside Boki. This gives you a guided start without needing someone to walk you through it.
When it appears:
- New members see it in their first workspace
- Workspace owners exploring an empty workspace can see it on a later visit
Reopening the tutorial: You can reopen the welcome tutorial any time from the user menu (top right), including on mobile.
Step 5: Explore the dashboard
You're now on the Boki dashboard. Take a moment to see what's here:
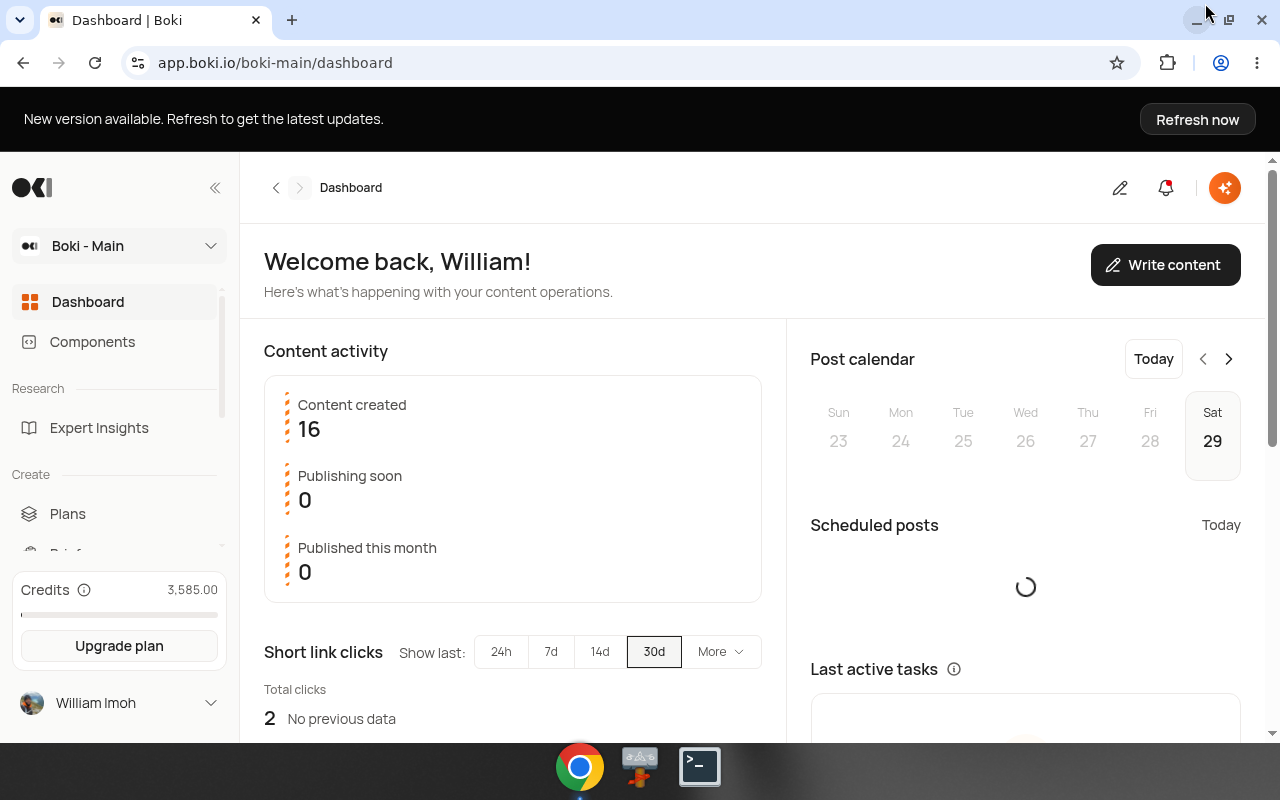
Left sidebar:
- Dashboard — where you are now
- Components — your MDX library
- Research: Expert Insights (Experts / Insights)
- Create: Plans, Briefs, Articles
- Publish: Promotions, Social scheduler, Short links, Opportunities
Top right: The orange sparkle icon. That's Boki's global agent — you'll use it in the next tutorial.
Content activity: Shows content created, publishing soon, and published this month.
Credits: Bottom left shows your available credits.
Summary
You now have a Boki account and workspace. The dashboard shows your content activity and credits.
Next: Create your first article — plan, brief, and write your first piece.